Sniper Elite 5 All Collectible Locations
In this guide we will show you where to find all 152 collectibles in Sniper Elite 5. The collectibles consist of 39 Classified Document, 24 Hidden Items, 24 Stone Eagles, 41 Personal Letters & 24 Workbenches.
🎮 Find more Sniper Elite 5 guides here.
Mission 1 - The Atlantic Wall
Collectible #1 (Classified Document 1): Obtained Automatically close to the start of the mission.


Collectible #2 (Workbench 1): You will enter this room during the main story objective just
after you lock pick a door.


Collectible #3 (Stone Eagle 1): Found on top of the vantage point on the south beach.


Collectible #4 (Hidden Item 1): Found in the stables near the middle of the map.


Collectible #5 (Personal Letter 1): Found on the top floor in the building close to the previous
collectible in the middle of the map.


Collectible #6 (Personal Letter 2): Found just outside a small building on the road to the north-east.


Collectible #7 (Stone Eagle 2): Found on a roof on a house out of bounds to the east.


Collectible #8 (Classified Document 2): Found in a safe in the bunker under the radar found in the north-east
part of the map. You will require a satchel charge to blow the safe open, you can get one above ground in this
same area.


Collectible #9 (Personal Letter 3): Found on the top floor of the north most building in the northen building
group.


Collectible #10 (Classified Document 3): Found in the safe on the bottom floor of the building where you picked
up the previous collectible. If you need a satchel charge, you can get one from the barn just outside.


Collectible #11 (Classified Document 4): Found in a safe in a small building in the north-west base where the blue
circled side quest is found. You can enter the building with a satchel charge or by getting the key from the general
in this area, you will also need a satchel charge to open the safe (one can be found just outside the building
to the west).


Collectible #12 (Workbench 2): In the same building as the previous collectible.


Collectible #13 (Hidden Item 2): Found in the building on the west side of the map.


Collectible #14 (Personal Letter 4): Found in a safe on the top floor of the hotel, you can open the safe with the key
that can be looted from one of the enemies in the hotel or by using a satchel.


Collectible #15 (Hidden Item 3): Found on the top floor of the pharmacy in the south-west town.


Collectible #16 (Personal Letter 5): Found in the building with the "Find Marcel" mission marker on it.


Collectible #17 (Personal Letter 6): Found in the small pagoda at the end of the path on the beach.


Collectible #18 (Stone Eagle 3): On the large roof in the south west town. You can see it from the pagoda
where the previous collectible was.


Colletible #19 (Workbench 3): Found on the top floor of the building with the "Find Marcel" mission marker.
You can get up by going behind the house and climbing the vines.


Mission 2 - Occupied Residence
Collectible #1-3 (Workbench 1 & Classified Documents 1-2): Found in the long building to the east of the map,
to get to the workbench and one of the documents you will need to open a locked door, you can do this by getting
the key from the officer outside or by using a satchel.


Collectible #4 (Stone Eagle 1): From the road close to the building with the previous collectibles in it, look
towards the manor past the pagado to see the eagle on the roof.


Collectible #5 (Classified Documents 3): Found on a box in a small enemy base on the east edge of the map.


Collectible #6 (Stone Eagle 2): To the left of the bridge before reaching the gate to the manor.


Collectible #7 (Stone Eagle 3): On a roof in the town to the west of the map.


Collectible #8 (Workbench 2): Found in the attic of a building to the west of the map. Use the vines on the
wall behind the house to reach it.


Collectible #9 (Personal Letter 1): Enter the manor through the west side of the courtyard, then go left and up to the
first floor, enter the office with the red floor to find the letter on the desk.


Collectible #10 (Personal Letter 2): Enter the manor through the west side of the courtyard, then go left and up the stairs
to get to the first floor, turn left and go down the hall, enter the door on your left and go to the end to find the
letter in the bedroom.


Collectible #11 & 12 (Personal Letter 3 & Hidden Item 1): Just like the previous collectibles, head up to the first floor, however
this time head through the door to the right of the office with the red floor, then take a right and go up to the top floor where
you can find the letter in the first bedroom to the right as well as a hidden item in the box you will have to lockpick.


Collectible #13 (Personal Letter 4): On the top floor of the tower in the north-east side of the manor.


Collectible #14 (Classified Documents 4): Found in Möller's Office on the first floor, you can open the door with the key you get
for killing Möller or by using a satchel. This collectible is part of the main objective.


Collectible #15 & 16 (Classified Documents 5-6): After picking up the previous collectible in Möller's Office, interact with the bookshelf,
the painting and the bust to open a secret room where these collectibles are found.


Collectible #17 (Hidden Item 2): Enter the manor through the west side of the courtyard, then go left and up the stairs
to get to the first floor, turn left and go down the hall, enter the door on your left and go to the end and interact with
the painting on the wall to reveal a safe, open it with a satcher or intel looted from one of the officers in the area.


Collectible #18 (Hidden Item 3): Loot the sniper in the tower in the north-east of the manor.


Collectible #19 (Workbench 3): Found in the basement to the south-east of the manor courtyard.


Mission 3 - Spy Academy
Collectible #1 (Stone Eagle 1): Found on a roof to the west of the castle, you can shoot this from the start of the level.


Collectible #2 (Personal Letter 1): Next to a truck before the main bridge to the castle.


Collectible #3-4 (Classified Documents 1-2): Found on the top floor in a building to the east once you cross the main
bridge to the castle.


Collectible #5 (Workbench 1): After crossing the main bridge, head right down the main path until you see some walls you can climb
on your left. After climbing the second one, head in to the door on your left and go down the hall to find the workbench.


Collectible #6 (Personal Letter 2): Looted from the officer that can be found in or around the church area.


Collectible #7 (Classified Documents 3): Found on the top floor of the church tower to the east of the castle.


Collectible #8 (Personal Letter 3): Found in one of the towers around the outter wall to the east of the castle.
You can get up by going though a small alley below it.


Collectible #9 (Stone Eagle 2): Found on the side of a tower close to the north-east courtyard. Can be seen from the
statue of a lady close to the stairs up to the castle.


Collectible #10 (Classified Documents 4): In the building next to the checkpoint heading up to the castle.


Collectible #11 (Hidden Item 1): In the bar on the west side of the map.


Collectible #12 (Personal Letter 4): In a trash can near the circular tower on the west side of the map.


Collectible #13 (Workbench 2): In the armory that is found on the other side of a locked door that you can open with a satchel or
with the key dropped by the nearby officer while going up the stairs towards the cathedral.


Collectible #14 (Personal Letter 5): Looted from the officer with the triangle hat in the main cathedral.


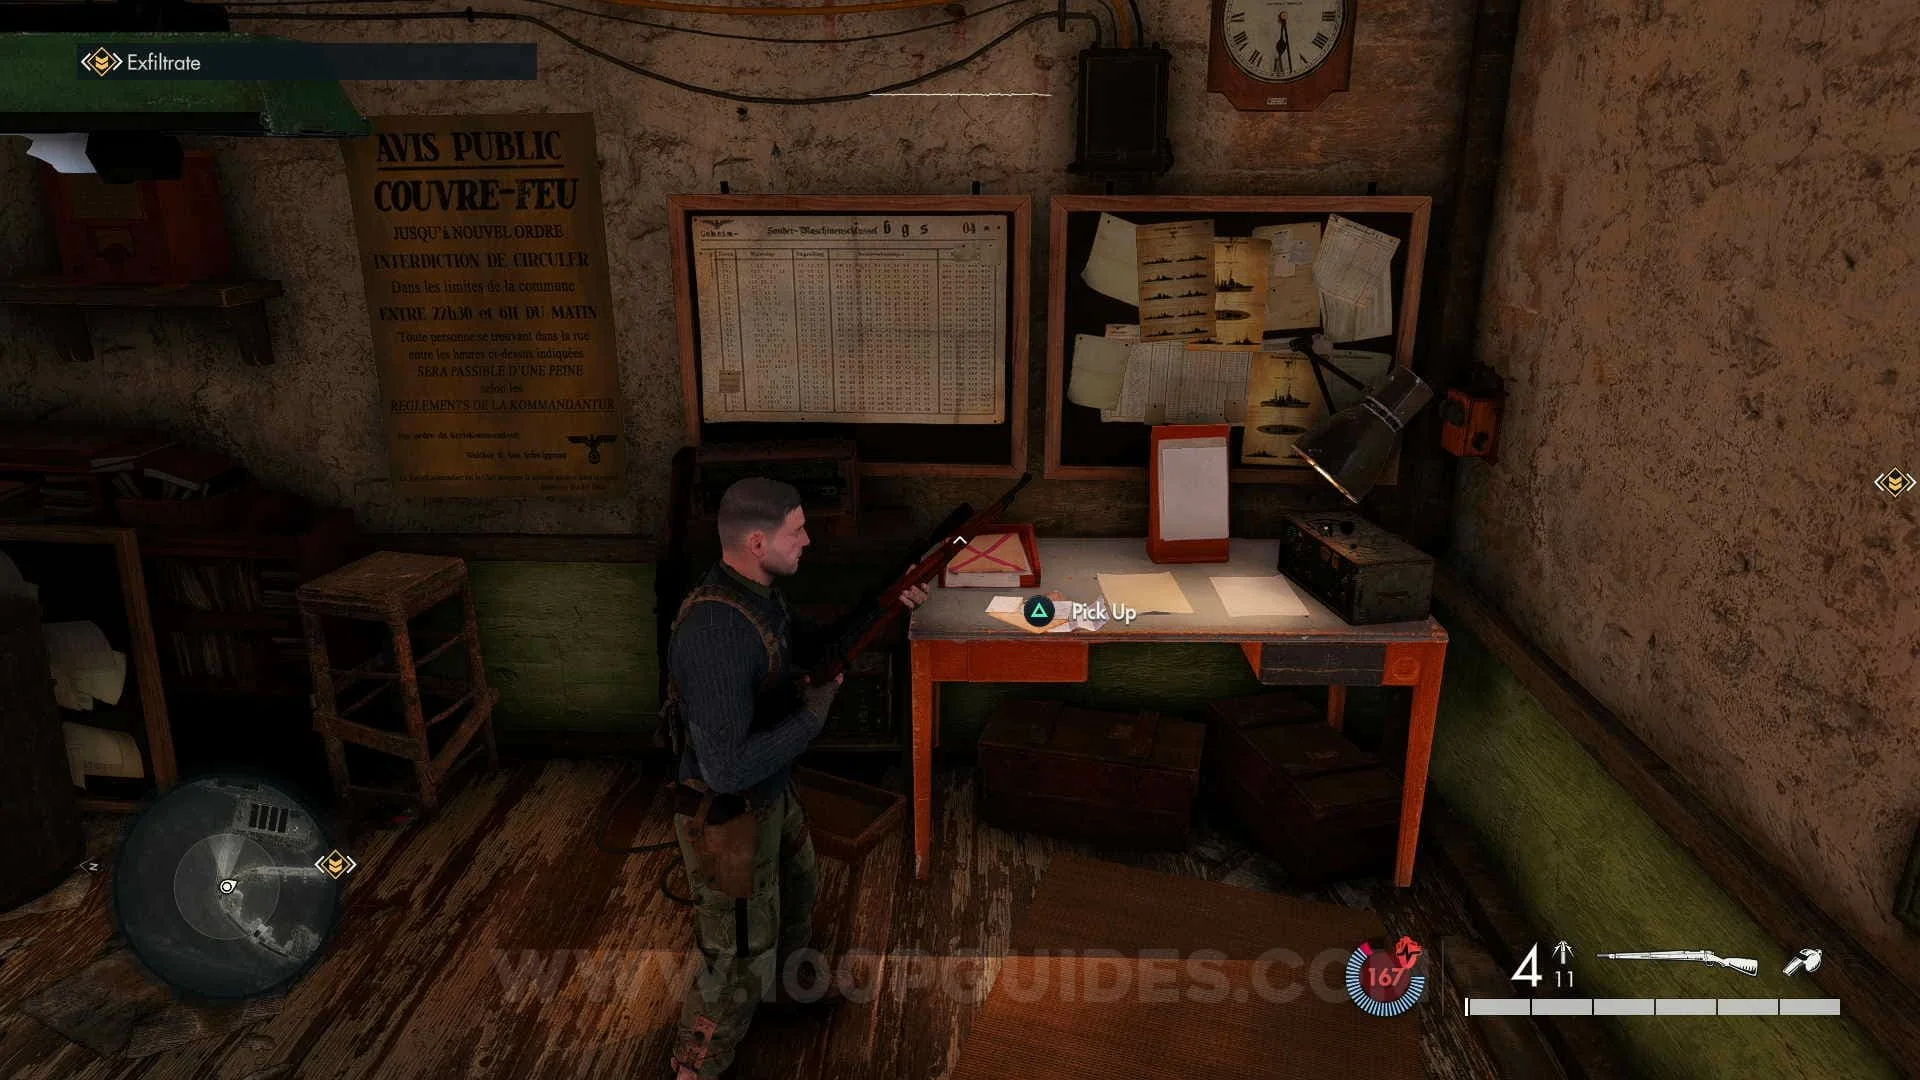
Collectible #15 (Classified Documents 5): Found on the top floor of the Spy Masters Office to the north of the island.


Colletible #16 (Hidden Item 2): Found in the safe in the next room from where you picked up the previous collectible. You can
open this if you already picked up the intel or if you have a satchel charge.


Collectible #17 (Hidden Item 3): Foun don the bottom floor of the big building to the north of the cathedral.

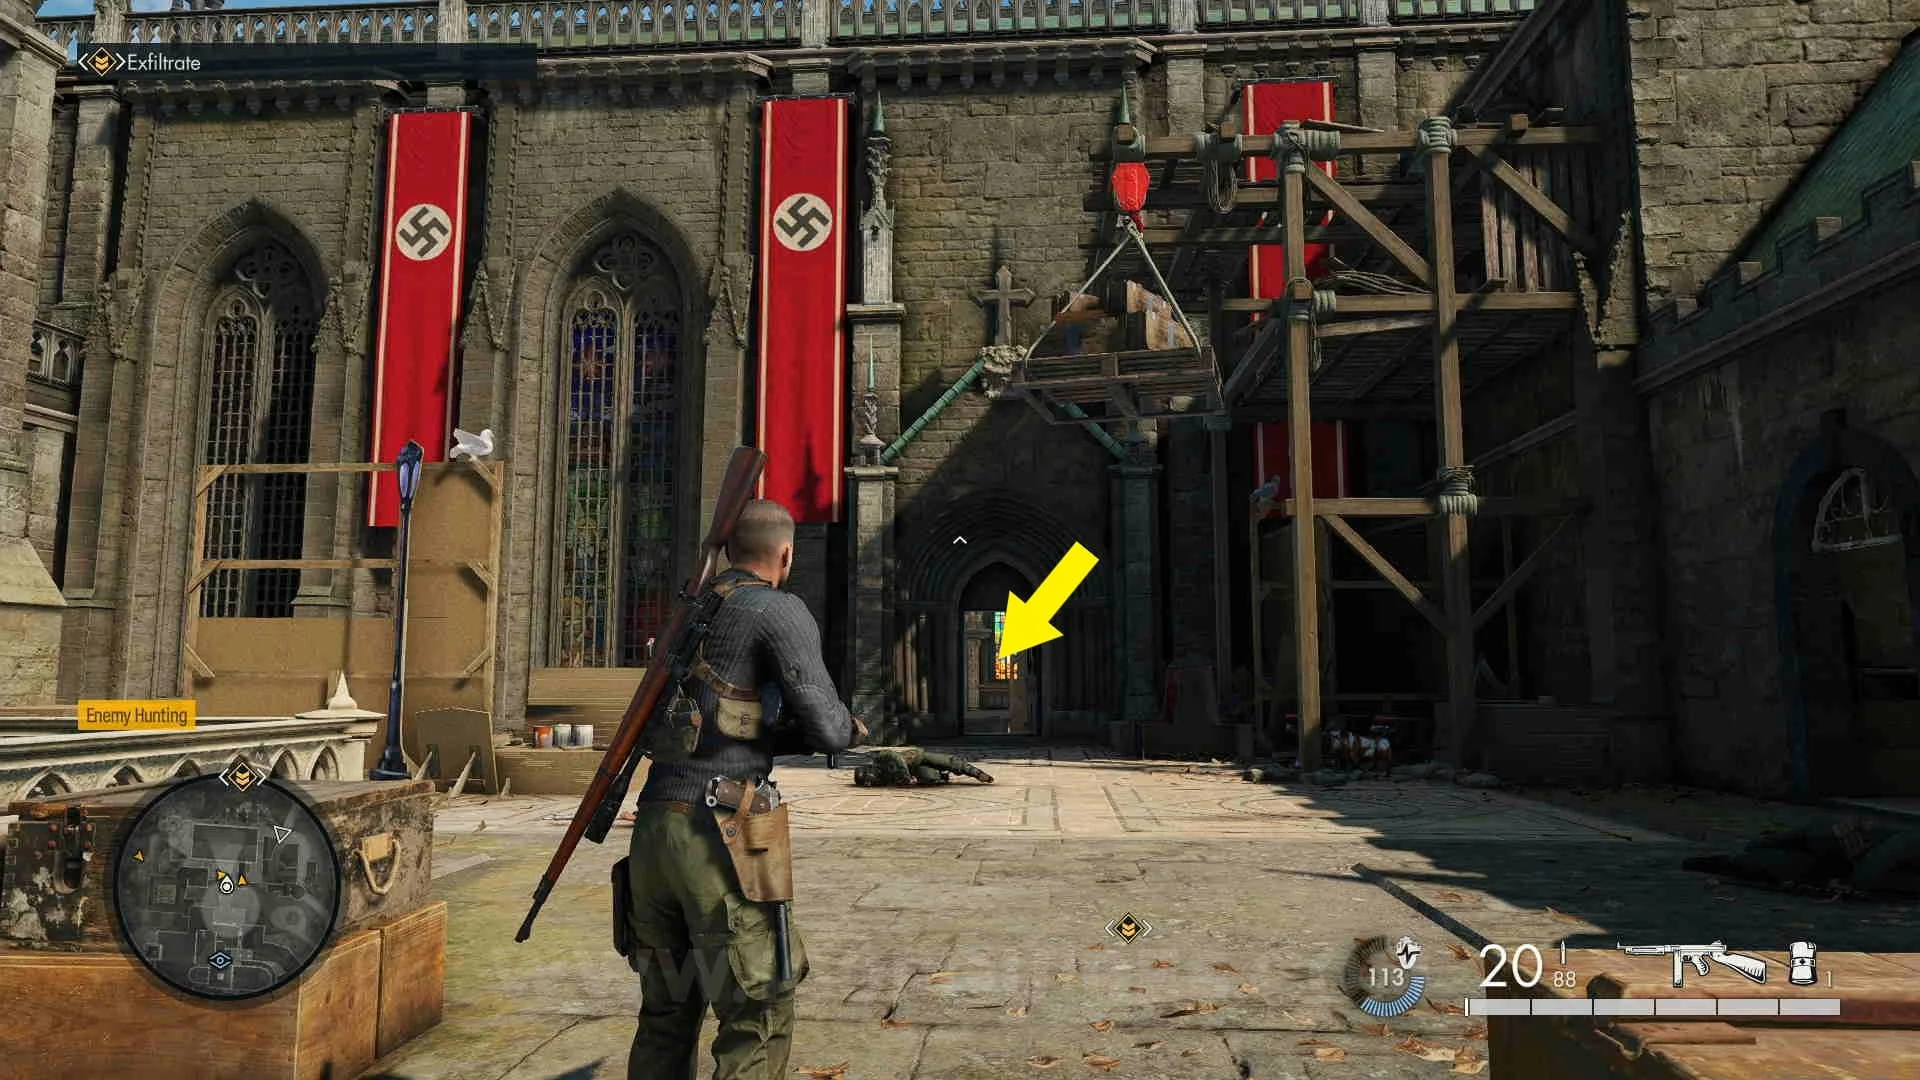


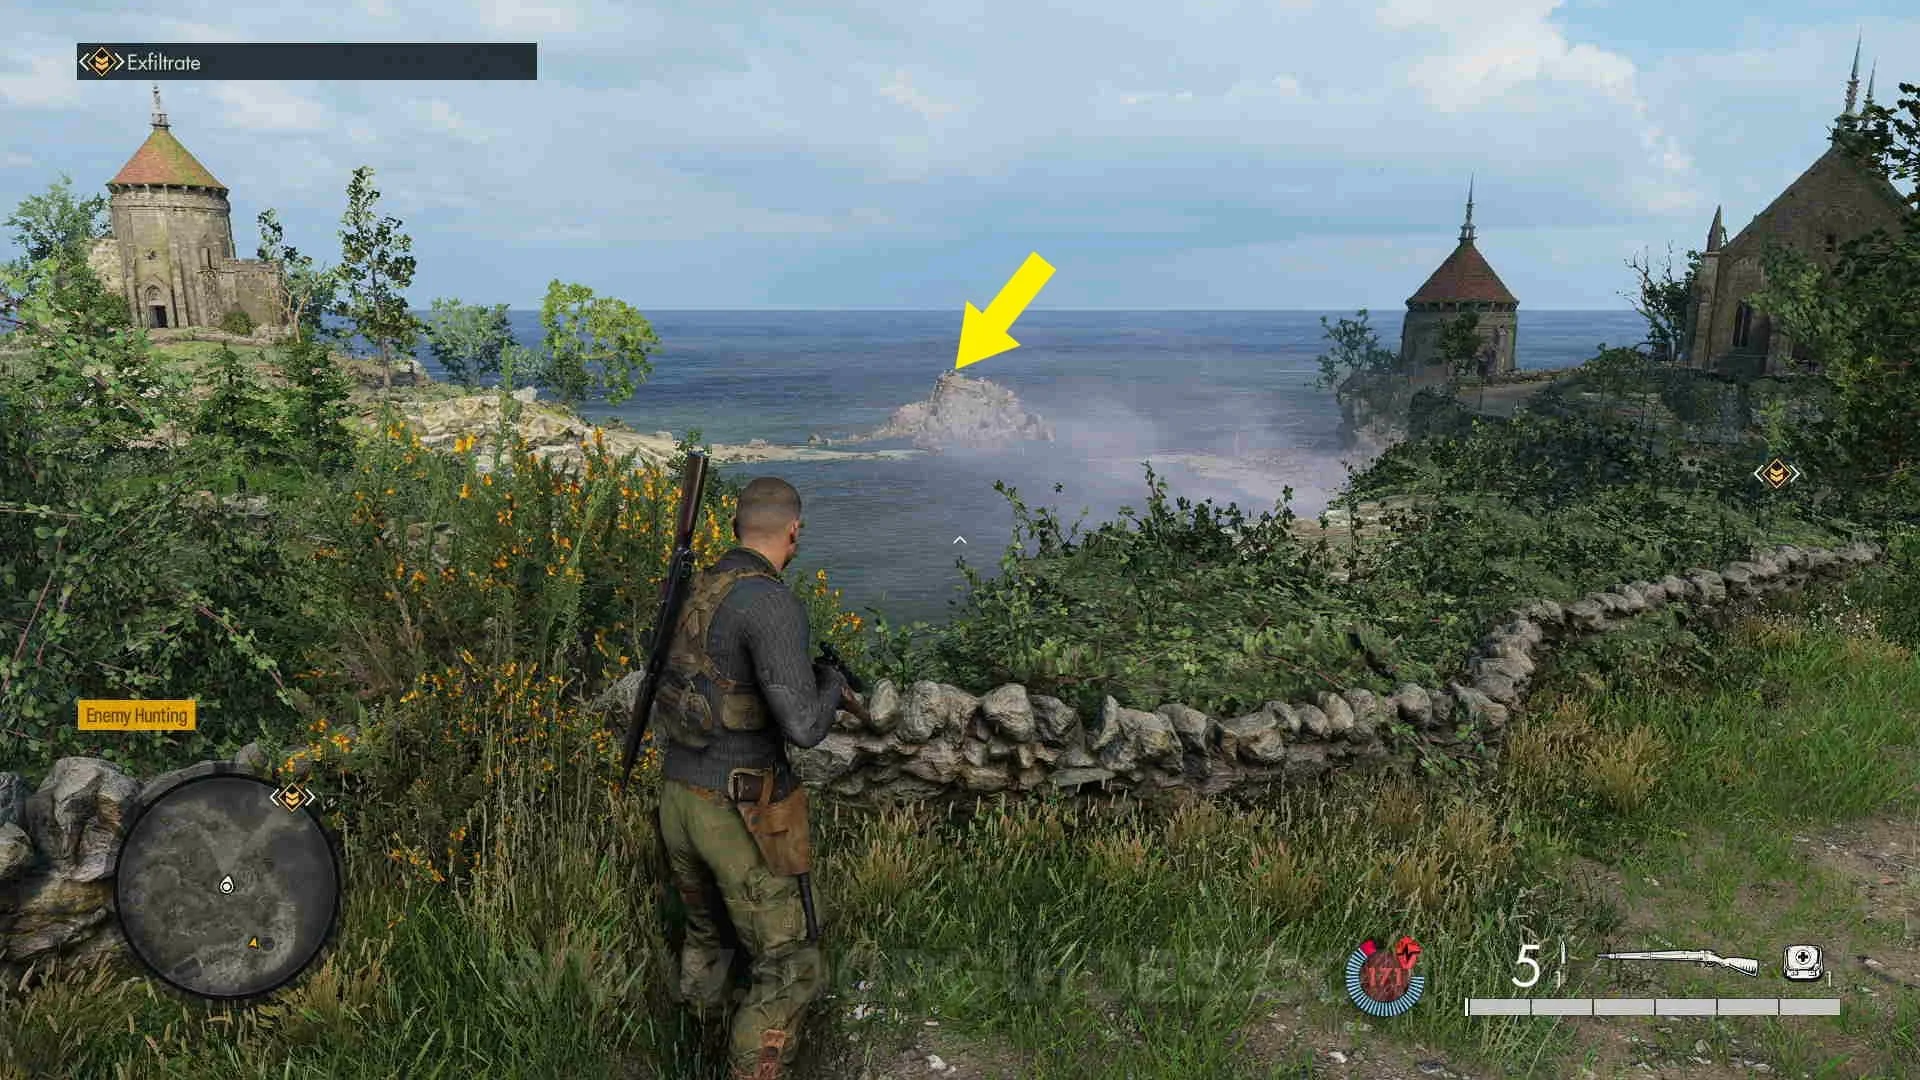
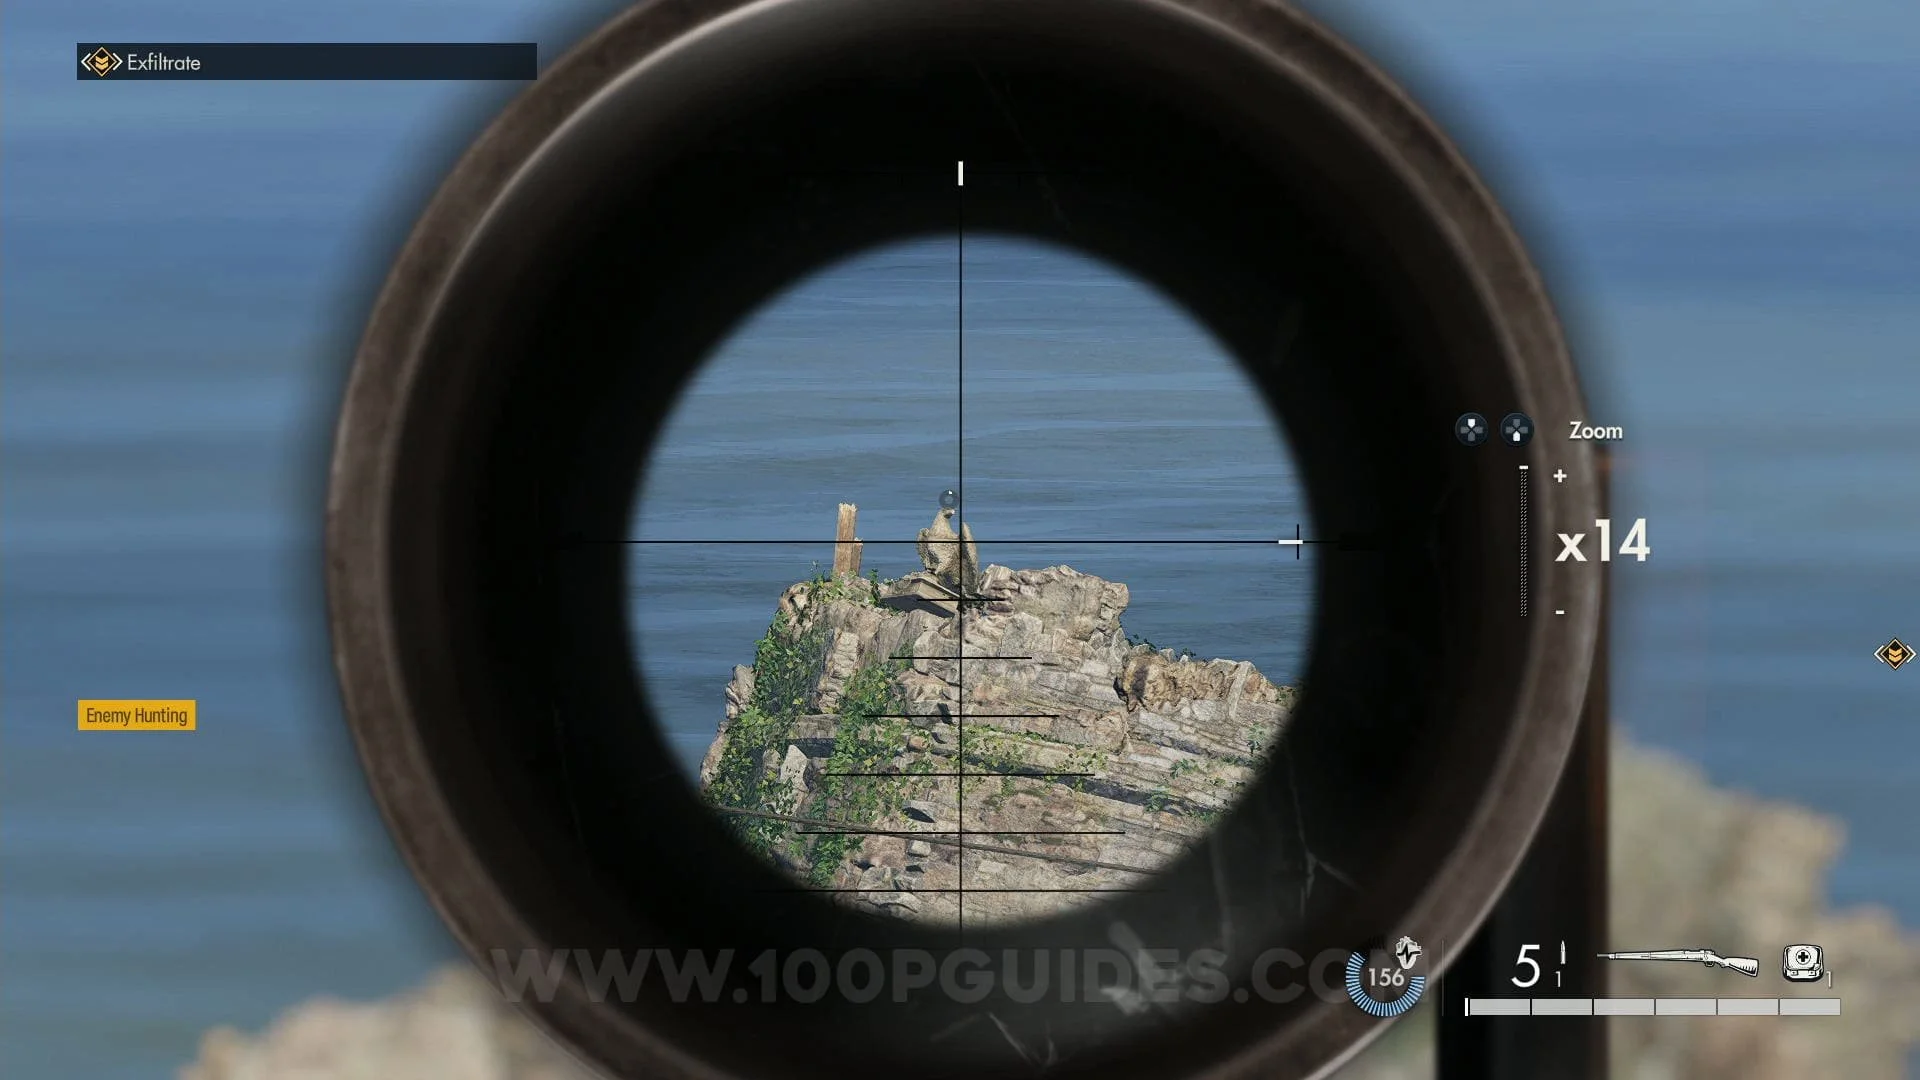
Collectible #18 (Stone Eagle 3): On the destroyed tower in the water on the northern edge of the map.

Collectible #19 (Workbench 3): From outside the castle walls, climb up the vines behind the big building to the north of the
cathedral to find the bench in a small room up against the building.


Mission 4 -War Factory
Collectible #1 (Personal Letter 1): Found in the warehouse the train tracks go through, you will have to lockpick the door first.


Collectible #2 (Classified Documents 1): Found in the safe on the top floor in the big warehouse, this is the same document that is
needed to complete one of the primary missions and can be opened by looting the code from the officer in this building or with a stachel charge.


Collectible #3 (Hidden Item 1): On some boxes on the ground floor of the same warehouse as the previous collectible.


Collectible #4 (Stone Eagle 1): Found on some ruins to the west of the map, you can see it from the warehouse.


Collectible #5 (Hidden Item 2): Found on the top floor in the south train shed.


Collectible #6 (Stone Eagle 2): On top of the big brick building to the south.


Collectible #7 (Personal Letter 2): In the room on the top floor in teh furnace building.


Collectible #8 (Personal Letter 3): In the north office inside the steelworks production line.


Collectible #9 (Classified Documents 2): From the wooden watchtower, go down the alley and up the stairs to
find the collectible in the office.


Collectible #10 (Stone Eagle 3): Found on the roof of the round furnace building, can be seen from the small watchtower.


Collectible #11 (Personal Letter 4): Found on the bottom floor in the corner of the casting facility.


Collectible #12 (Workbench 1): Pick the lock on the top floor of the casting facility, then climb down the ladder to reach the
armory that has the workbench in it.


Collectible #13 (Workbench 2): Found on the top floor in the small building south-west of the production line. First climb the ladder
outside and then plant a satchel on the door to get in.


Collectible #14 (Workbench 3): Found behind the locked door that requires a satchel charge or the key from the enemy upstairs to open
in the refinery.


Collectible #15 (Classified Documents 3): In the refinery behind the locked door you can lockpick to the left of the door you used a
satchel on to get the previous collectible.


Collectible #16 (Hidden Item 3): Found in the northern part of the map on some beams.


Collectible #17 (Classified Documents 4): Found in the northen part of the map on some wooden beams.


Collectible #18 (Personal Letter 5): Found on the ground floor of the north most building.


Collectible #19 (Personal Letter 6): Found in the little building on the dam, can be accessed from the east side of the map


Mission 5 - Festung Guernsey
Collectible #1 (Classified Documents 1): Found in a safe on the top floor of the north-east corner building
in the blue circle that can be accesse dby climbing the vines found outside the north building, you will first
have to get the safe code (or a satchel charge) from the room next door.


Collectible #2 (Personal Letter 1): Found on the 1st floor in the bunker.


Collectible #3 (Stone Eagle 1): On top of the tower in the center of the map.


Collectible #4 (Workbench 1): In the same tower as the previous stone eagle, you can climb up the side of the tower.


Collectible #5 (Stone Eagle 2): Found on top of the big bunker to the west.


Collectible #6 (Classified Documents 2): Found on the bottom floor of the big bunker to the west.


Collectible #7 (Classified Documents 3): Found in the east most room (same room as the safe) of the underground bunker to the west,
this bunker is part of a main objective.


Collectible #8 (Workbench 2): Found in the trenches to the west of the map close to a tank.


Collectible #9 (Hidden Item 1): In the south-west bedroom on the top floor or the building in the middle of the map.


Collectible #10-11 (Hidden Item 2 & Personal Letter 2): Found in the basement of the little house to the east of the map.


Collectible #12 (Personal Letter 3): Looted from the officer that can be found around the south-east tower area.


Collectible #13-14 (Personal Letter 4 & Workbench 3): Found in the basement of the small building just west of the red and blue circles.
Once inside crawl under the table to get to the basement white the 2 collectibles in it.


Collectible #15 (Personal Letter 5): Looted from the officer dressed in brown that can be found around the south of the red and blue circles.


Collectible #16 (Classified Document 4): Found in the north most room inside the underground hospital.


Collectible #17 (Classified Document 5): Enter the underground hospital through the south entrance, then find the collectible in the first
door on the left.


Collectible #18 (Hidden Item 3): Found in the north-west green building in the construction site.


Collectible #19 (Stone Eagle 3): On the roof of the bunker found to the north-east.


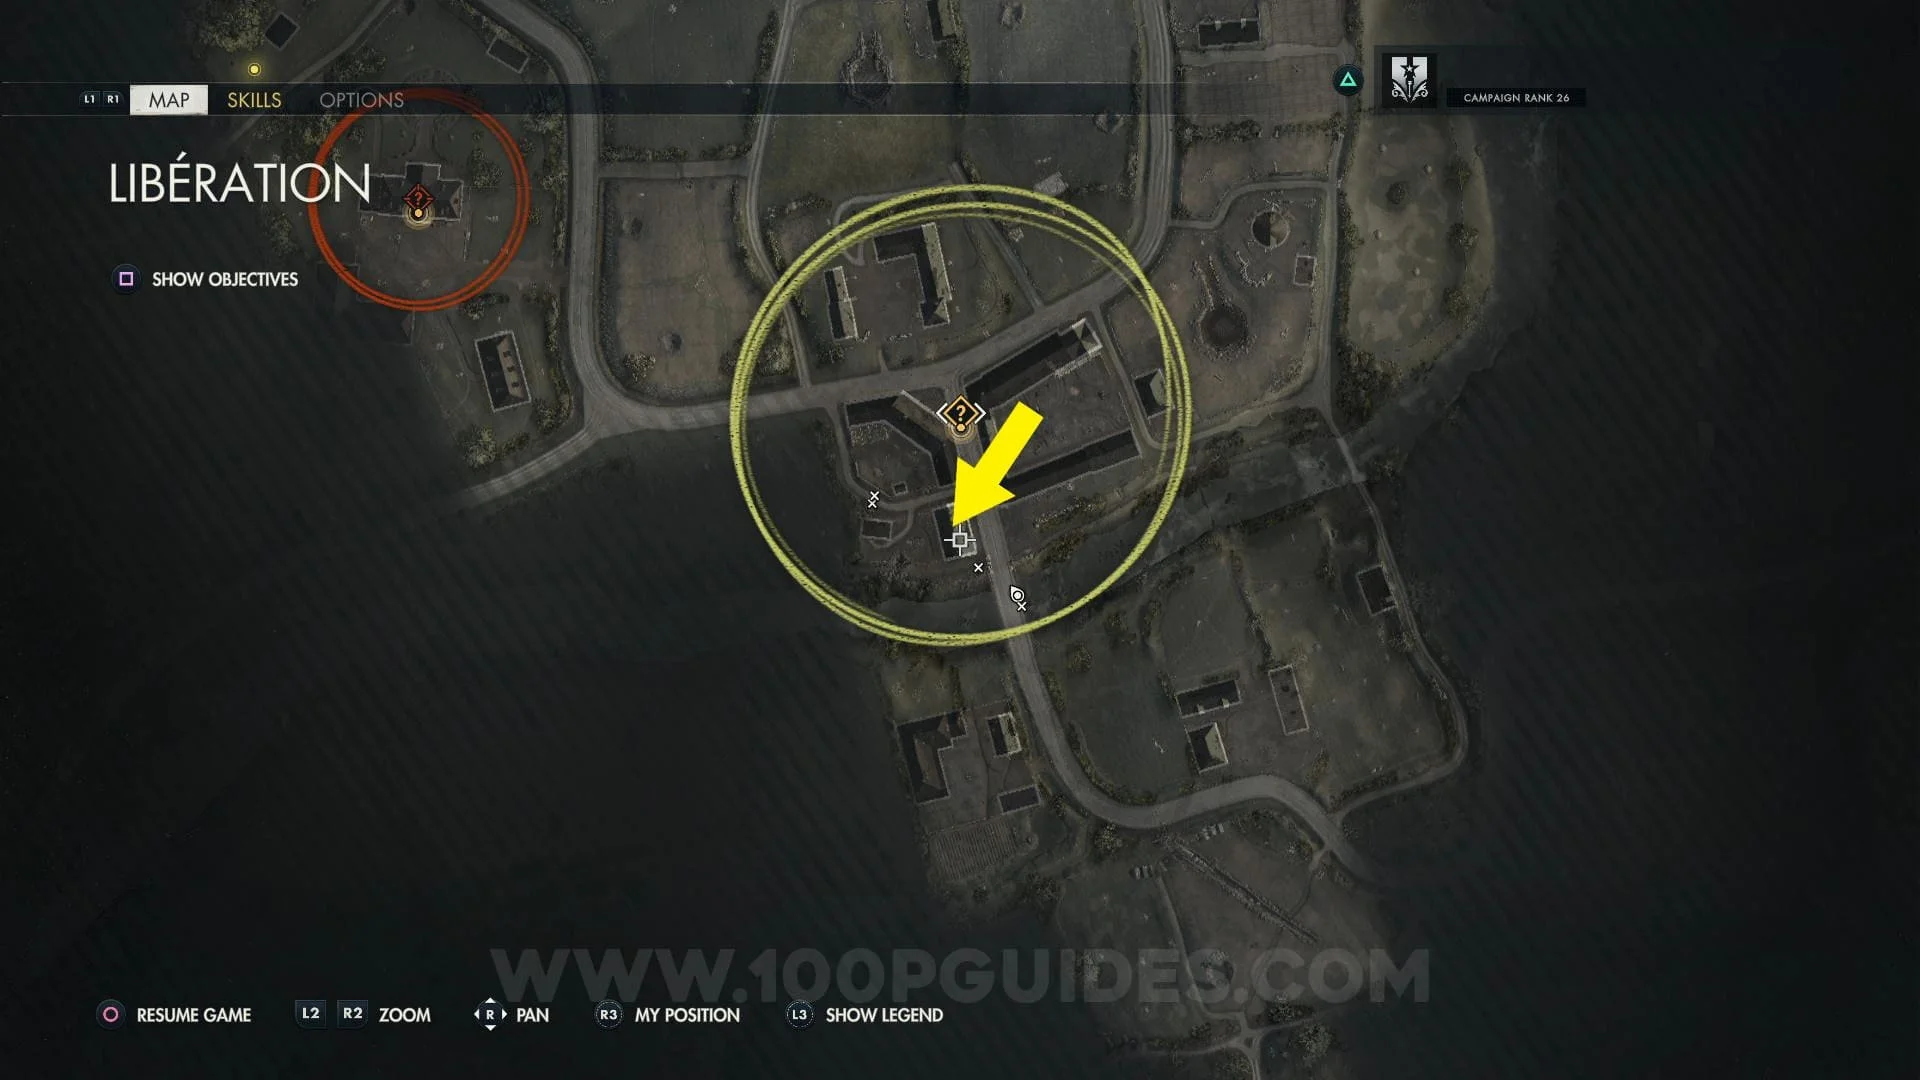
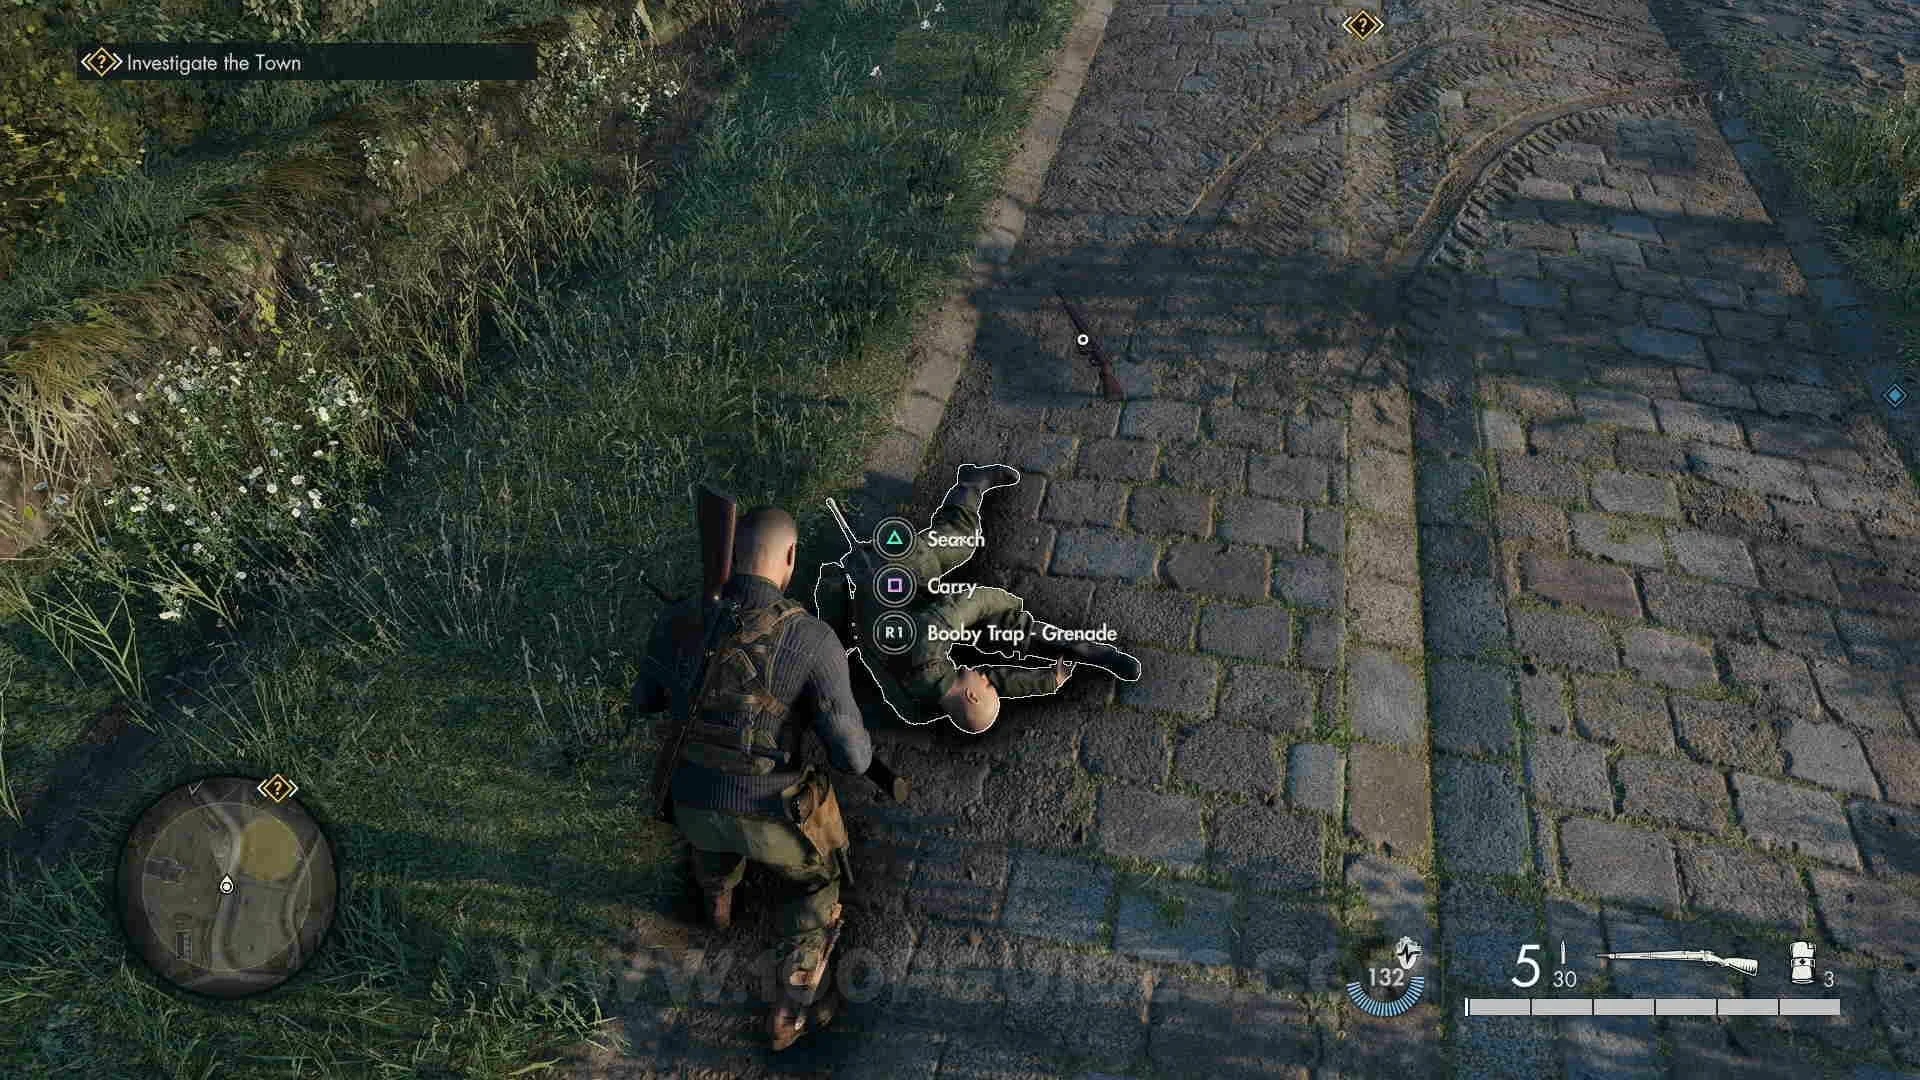
Mission 6 - Liberation
Collectible #1 (Personal Letter 1): Can be looted from one of the soldiers that arrives on a truck close to the
first buildings you come across on your right.


Collectible #2 (Classified Documents 1): Found on the top floor in the biggest building of the 3 first houses you see to your left.


Collectible #3 (Classified Documents 2): Obatained on the top floor of the first building to your right after crossing the bridge.


Collectible #4 (Workbench 1): First use the stairs to get to the top of the tower just south-east of the tower with the sniper in it, then exit
on to the rooftops and enter another building through a hole in the roof, then drop down inside to find the workbench.


Collectible #5 (Stone Eagle 1): On top of the windmill in the field to the east of the building with the previous collectible in it.


Collectible #6 (Personal Letter 2): Looted from a soldier that can be found around the house with the red objetive in it.

Collectible #7 (Personal Letter 3): Found in the attic of the house close to the left road before the second bridge.


Collectible #8 (Hidden Item 1): Looted from one of the soldiers next to the downed plane in the center of the map.


Collectible #9-10 (Hidden Item 2 & Workbench 2): Found in the basement of the building with the waterwheel outside, you can access it
by removing the broken floorboards.


Collectible #11 (Classified Documents 3): Found outside the houses to the east of the destroyed plane.


Collectible #12 (Stone Eagle 2): On the west side of the destroyed church.


Collectible #13 (Classified Documents 4): On the top floor behind a door you have to lockpick in the east most building where the 3 snipers are.


Collectible #14 (Personal Letter 4): Found in the trenches close to an anti-aircraft artillery.


Collectible #15 (Classified Documents 5): In a bunker close to the north-west trenches exit.


Collectible #16 (Personal Letter 5): Found on a box in the green building to the east, close to a checkpoint.


Collectible #17 (Workbench 3): On the top floor of the building to the right before crossing the north most bridge. You can get in to the
room with the workbench by climbing up the vines on the side of the building or by shooting the lock with AP ammo from the other side of the door.


Collectible #18 (Hidden Item 3): Found in the bedroom on the top floor in the first building to the right after crossing the bridge to the north
where you have to connect the explosives to clear the bridge.


Collectible #19 (Stone Eagle 3): Found in a window of a ruined building to the north of the fountain at the very top of the map.


Mission 7 - Secret Weapons
Collectible #1 (Classified Documents 1): Looted from the soldier that arrives on a bike close to the small hut just north of the original start point.


Collectible #2 (Workbench 1): Found in a cave blocked by some wood that you can dismantle found by going down the small path to the left of the bridge.


Collectible #3 (Stone Eagle 1): Can be found on the west side of the tower in the fort found in the western side of the map.


Collectible #4 (Classified Documents 2): Found on the top floor of the same tower where the stone eagle was, you can dismantle some wood around the left
hand side of the tower or use the key looted from one of the enemies around the area.


Collectible #5 (Hidden Item 1): Found under the bridge just south of the big body of water.


Collectible #6 (Classified Documents 3): Looted from the officer in brown close to the train in the blue circle.


Collectible #7 (Personal Letter 1): On a table on the top floor of the office in the trainyard to the east.


Collectible #8 (Personal Letter 2): Found in the abandoned house on the eastern edge of the map. To enter the house you will have to climb
up a pipe and then around to drop down to a blue door that you can lockpick, the letter can then be found on the bottom floor.


Collectible #9 (Stone Eagle 2): Found on the little hill to the south of the abandoned house. Go around the side to have an angle to shoot the eagle.


Collectible #10 (Classified Documents 4): Looted from Jungers (the main objective in the red circle).


Collectible #11 (Classified Documents 5): One of the blue objectives, can be found in the room with a load of drawings and plans on the second floor.


Collectible #12 (Personal Letter 3): Once inside the northern round building with a main objetive in it, go up the blue stairs to the top of the
tower in the middle, you will find the letter in the office at the top.


Collectible #13 (Workbench 2): In the big round building, head down the spiral stairs in the middle and take the first door to the right, go to the end
and open the door with the key (dropped from the officer in the area) or by using a satchel, the workbench is found inside.


Collectible #14 (Hidden Item 2): In the big round building, head down the spiral stairs in the middle and take the first door to the right.
In the hall enter the first door to the left and find the hidden item under one of the tables.


Collectiblle #15 (Personal Letter 4): In the room at the top of the bunker entrance. Use a satchel or loot the key from the officer in the
circular area just south.


Collectible #16 (Personal Letter 5): Head through the whote tunnel to the west of bunker door where the previous collectibles was. Once inside,
go left to find the collectible on a small table.


Collectible #17 (Workbench 3): After heading through the same tunnel as the previous collectible. Head right and go outside where you can see the V2 rocket
(primary objective in the water). The workbench can be found by opening the door at the end on your right. You will need the key from one of the officers in this
area or a satchel.


Collectible #18 (Hidden Item 3): Found on the table inside the little wooden building found at the east end of the dam.


Collectible #19 (Stone Eagle 3): Found in one of the holes on the north side of the dam.


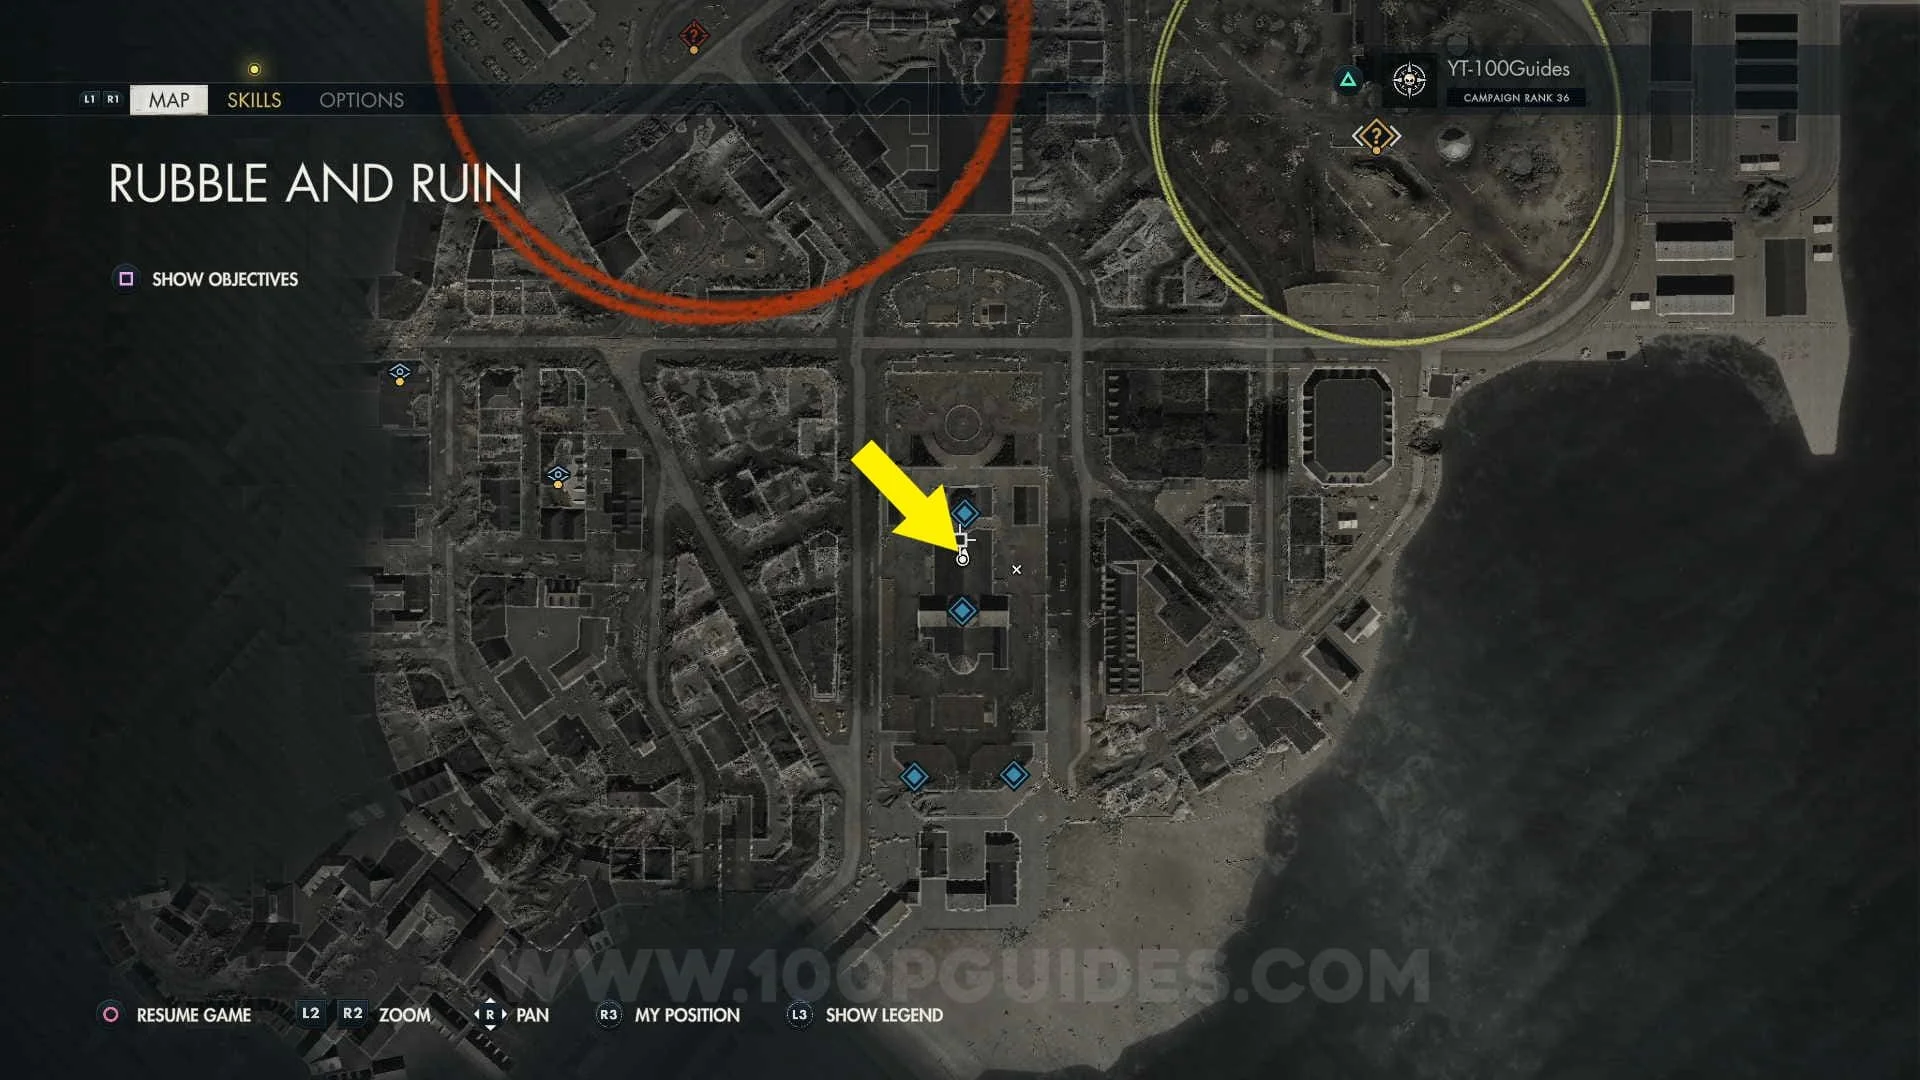
Mission 8 - Rubble And Ruin
Collectible #1 (Classified Documents 1): Found on a box close to the statue in the town close to the original starting point.


Collectible #2 (Classified Documents 2): Found in the building with the 2 soldiers in front of you after sliding down close to the
start of the level.


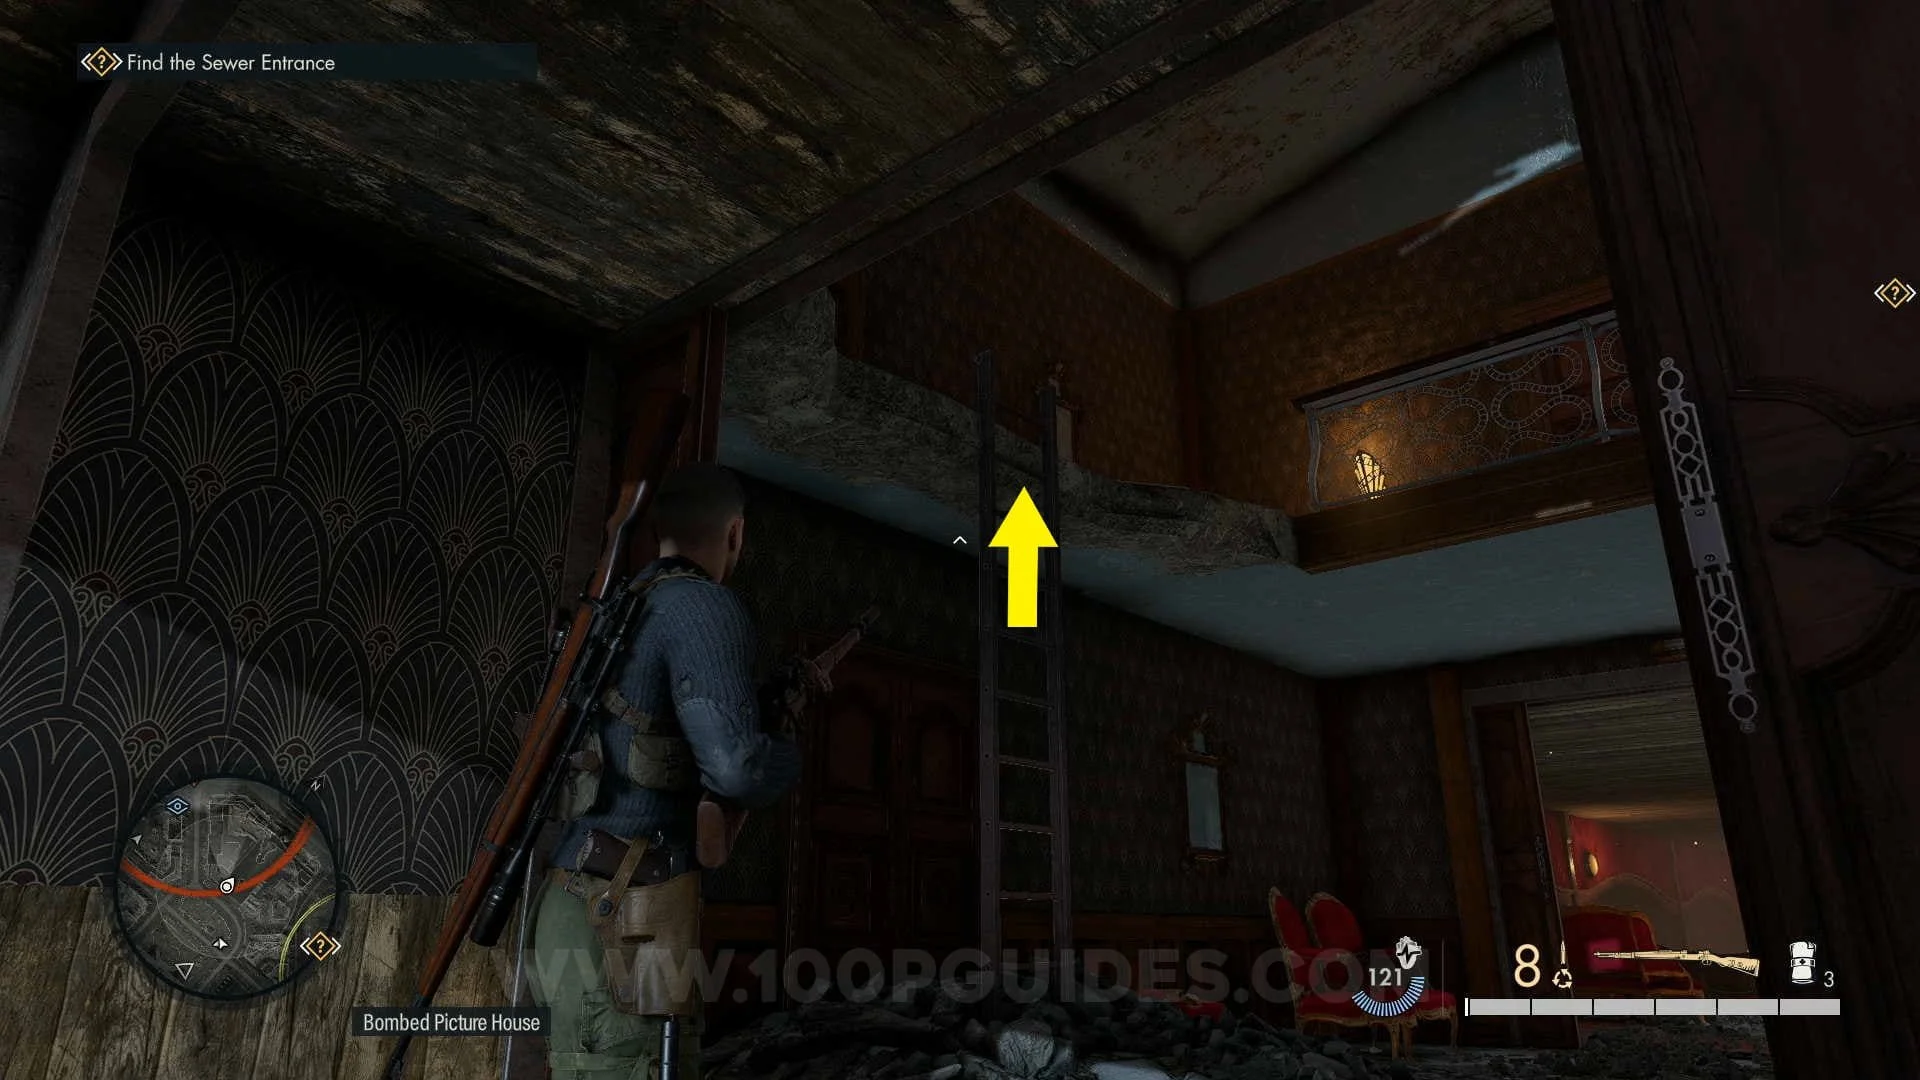
Collectible #3 (Personal Letter 1): First, go down the alley behind a destroyed building (check location below) and climb the ladder
to enter the top floor of the building. Now go downstairs and pick up the key from the wall, then head upstairs again and open the locked
door to get the collectible.


Collectible #4 (Stone Eagle 1): Go to the red cart to the east of the beach and look through the gap inbetween the cart and the building
to see the eagle on a roof far to the west.


Collectible #5 (Personal Letter 2): Found on the ground floor in the building with the blue eye (the one right next to the red cart).


Collectible #6 (Personal Letter 3): In the hotel, go through the door to the left of the main stairs on the ground floor.


Collectible #7 (Classified Documents 3): Found in a safe on the top floor of the hotel behind a locked door. The key can be found in the chest at the
top of the stairs (if it's not there, check look around the bottom floor). You can open the safe with a stachel charge or by collecting the previous
personal letter.


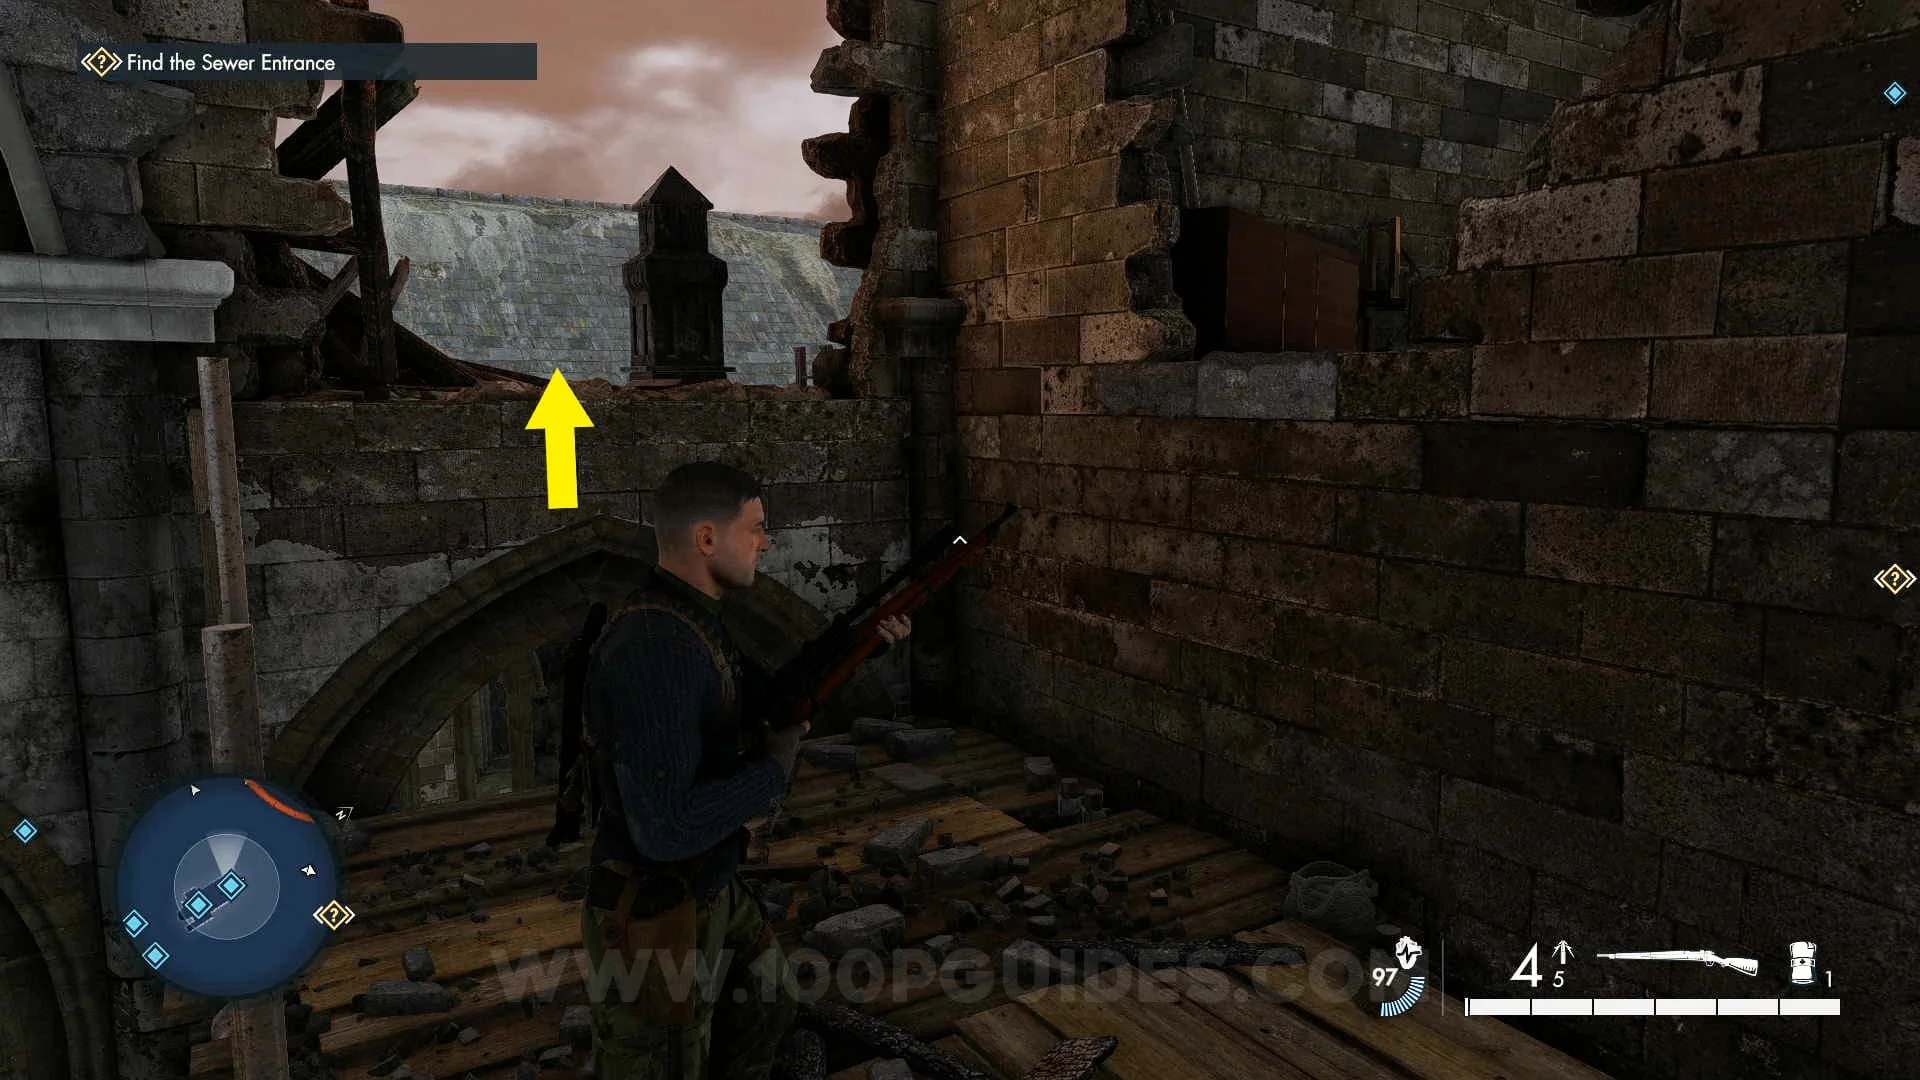
Collectible #8 (Hidden Item 1): Enter the church through the main entrance. Now climb the ladder to your left. Now climb a second ladder until you
can get off half way up. The painting found on this floor is the hidden item.


Collectible #9 (Workbench 1): Climb the ladder inside the church, then climb up to your left and down the hole to your right to enter the crypt
where you can find the workbench.


Collectible #10 (Classified Documents 4): Found in the basement in the building with the blue eye. You can get to the document by using a satchel charge
on the blue door or by going around to the left.


Collectible #11 (Classified Documents 5): Inside the corner cafe to the west. You will need to go to the top floor and open the first blue door. Then
climb up to the attic through the hole in the roof to find the document on the floor.


Collectible #12 (Personal Letter 4): Climb the ladder to your left as soon as you enter the theater. On this floor you will find a crate with the collectible
in it (if you need a crowbar you can find one on the same floor).


Collectible #13 (Workbench 2): Found on the top floor of the building with the blue eye on the opposite side of the road across from the building
with the red circle around it.


Collectible #14 (Stone Eagle 2): On the roof of the big building where the red objective is.


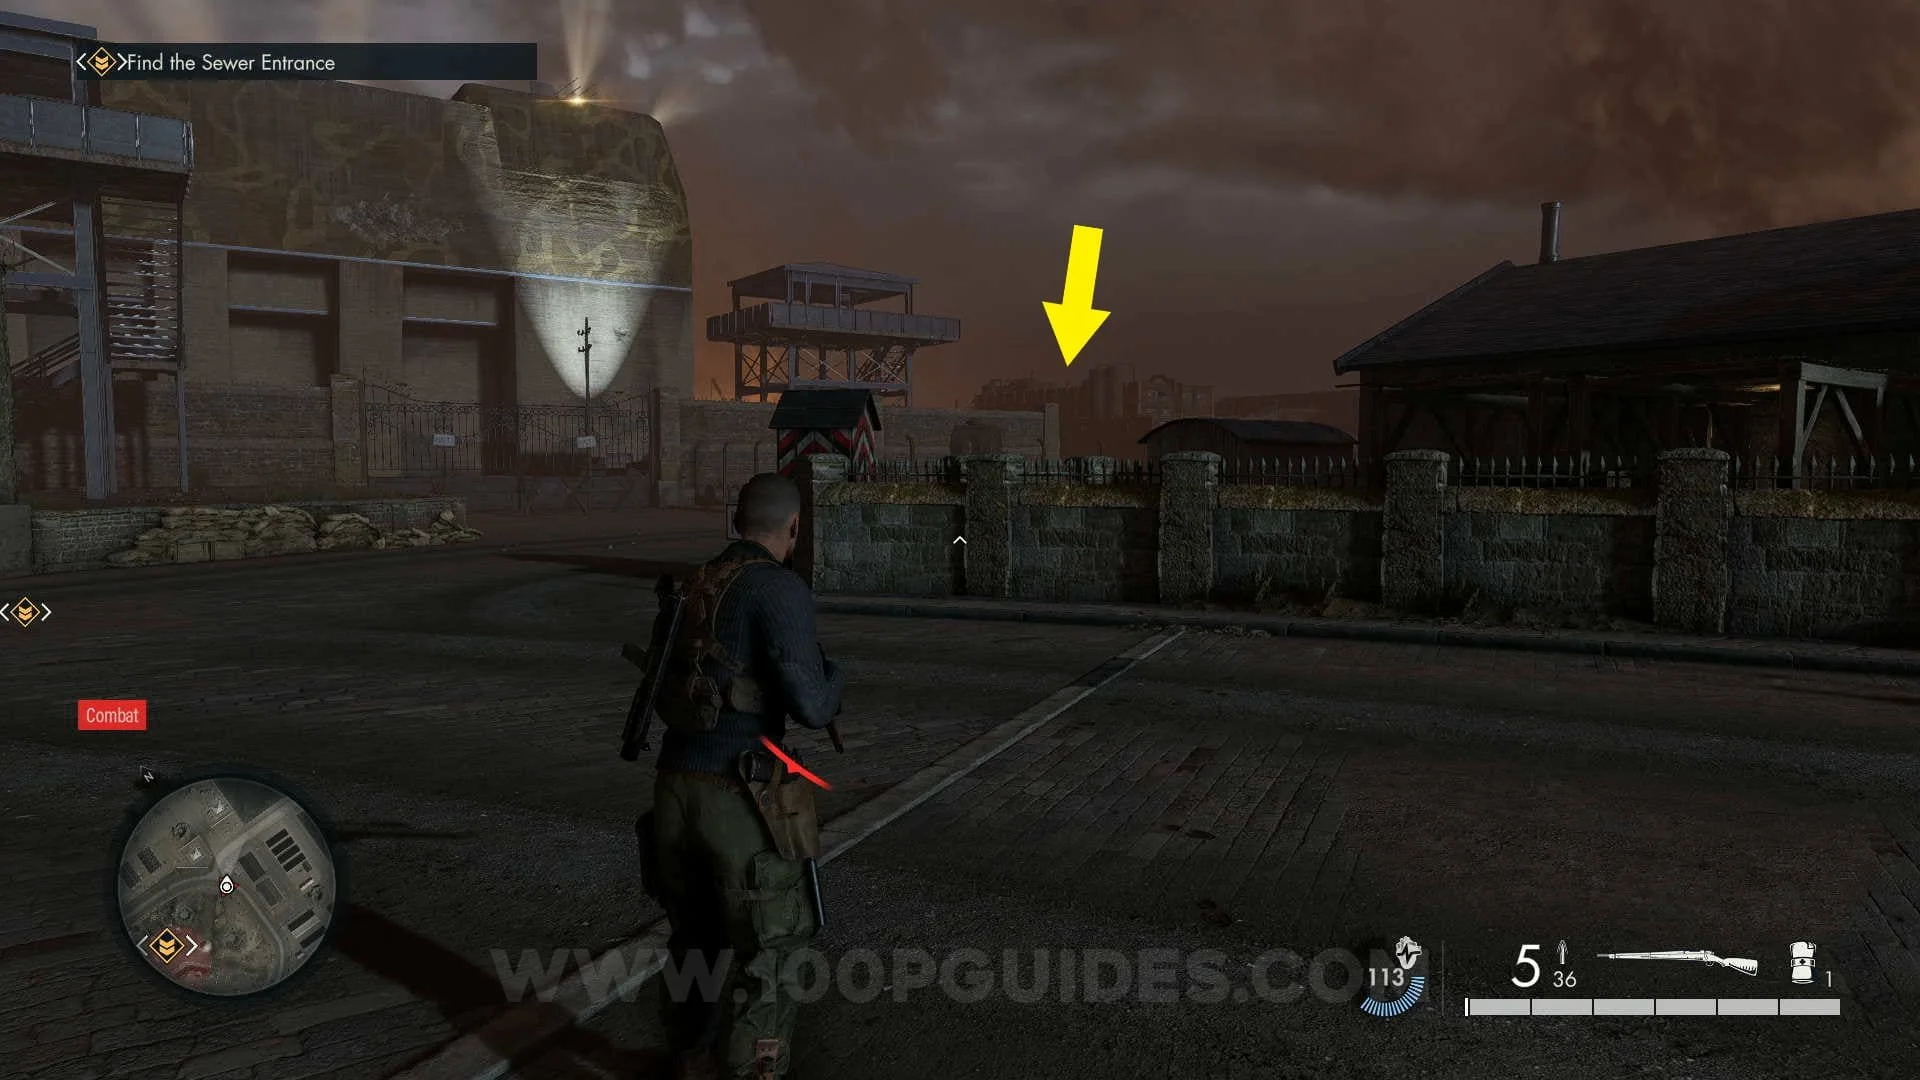
Collectible #15 (Stone Eagle 3): Go to the north-east corner of the road where the "HALT" sign is. You can see the eagle to the north-east on a building far
out of bounds.


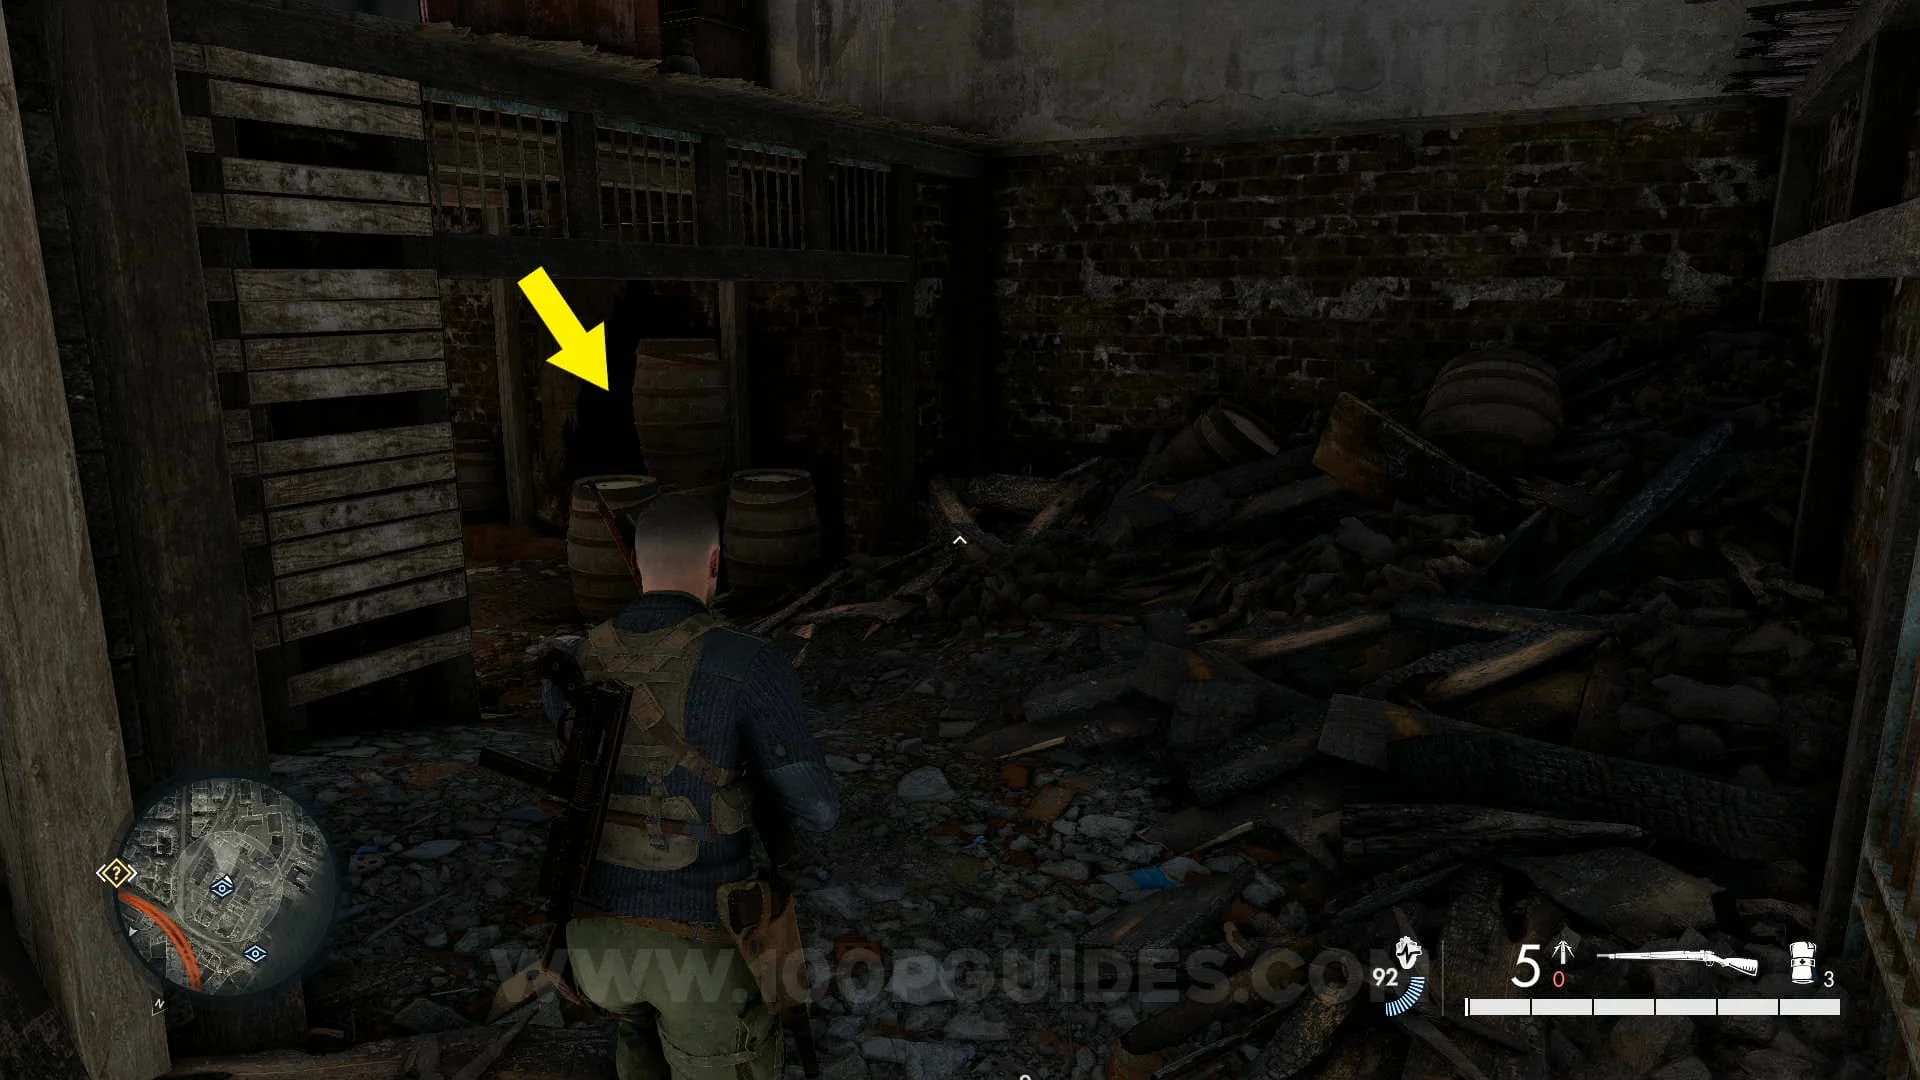
Collectible #16 (Personal Letter 5): To your right behind some boxes as soon as you enter the sewers.


Collectible #17 (Hidden Item 2): As soon as you enter the sewers you will see a gate you can open with a satchel charge. The hidden item is found inside a crate the other side of this gate. If you don't have a satchel you can get the key from a safe a little further ahead (you can open the safe if you picked up the
previous collectible). You can also get a crowbar from the room with the safe in it if you need one.


Collectible #18 (Workbench 3): Found in the armory to your left once you encounter the first enemies after the swamp. The key can be obtained from the box in this same room.


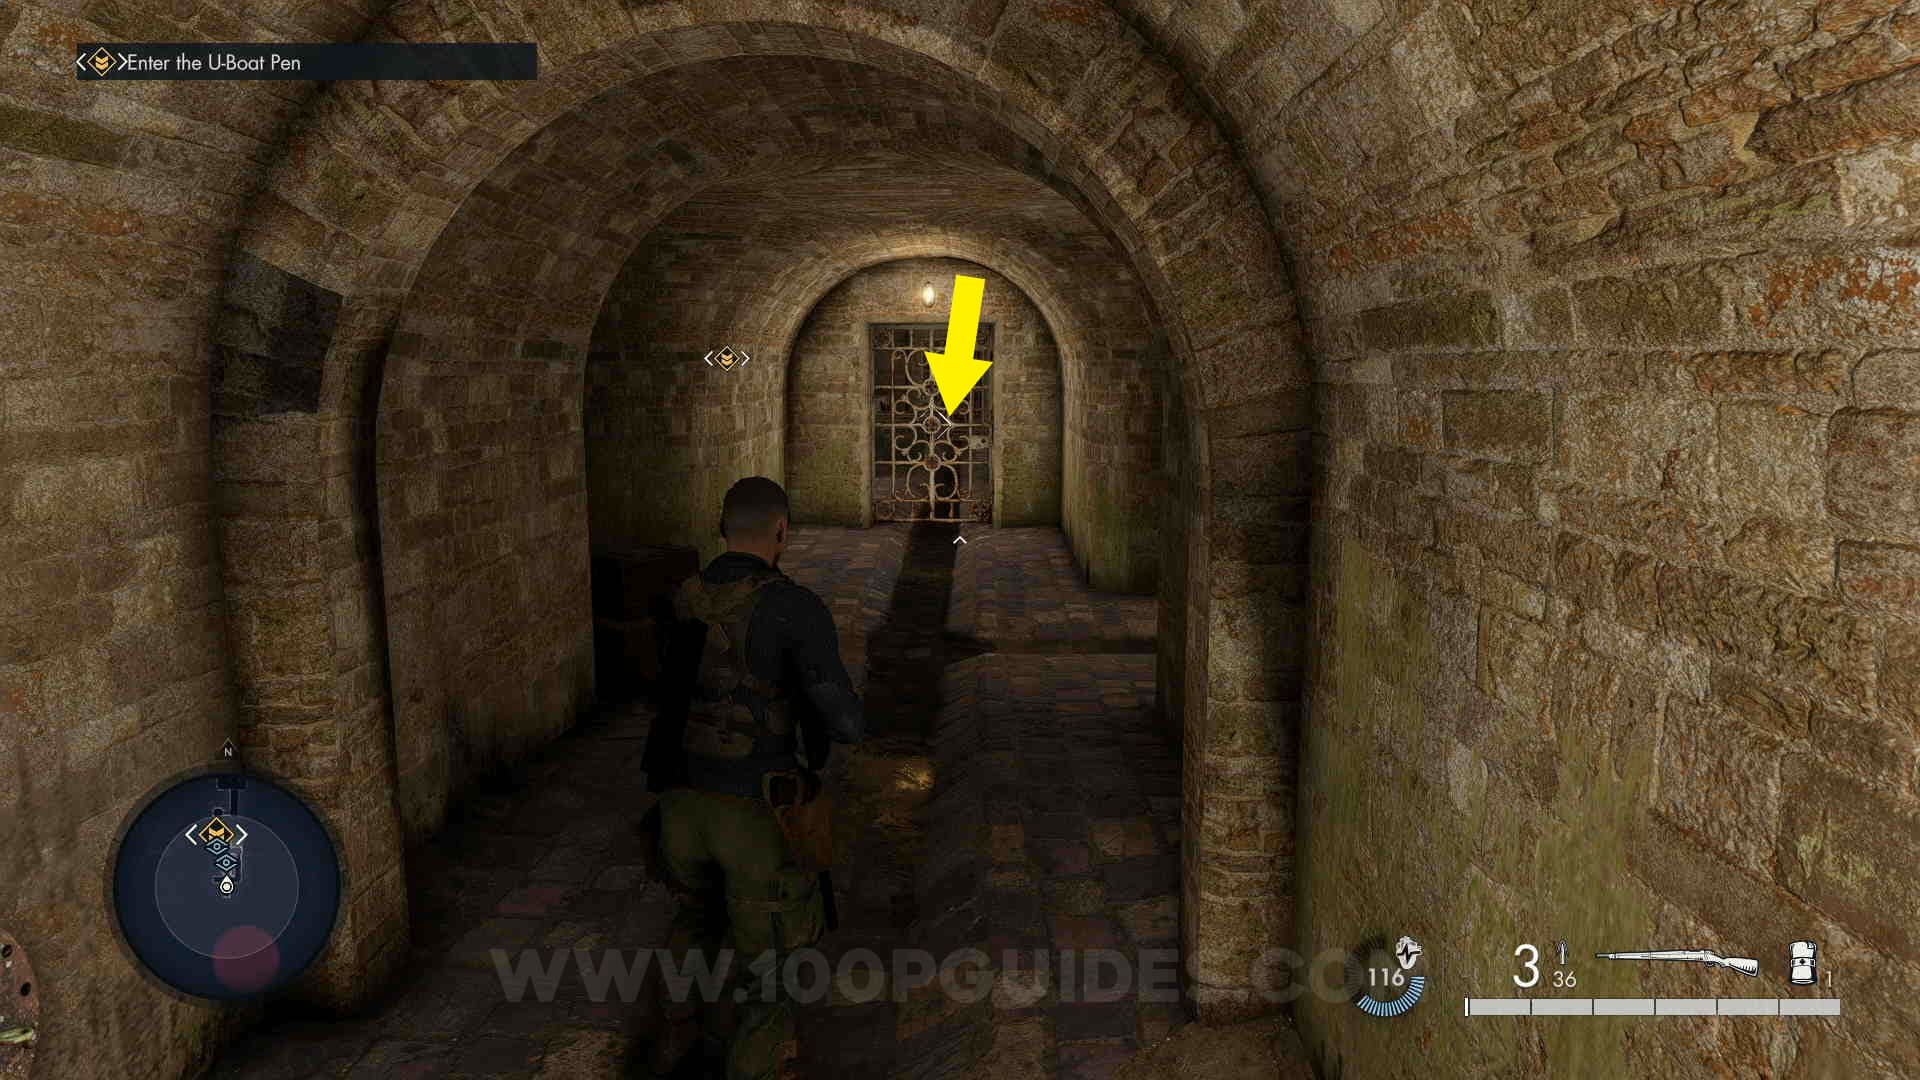
Collectible #19 (Hidden Item 3): In the room above the pumps (main objective).


Video Guides (Playlist)
If you found this guide helpful and would like to support our work, you can do so by pressing the Ko-fi button below